NVR local interface - Settings: Camera
Here you configure the cameras and their activities.
- Manage Camera page
- Image page
- Motion page
- PTZ page
Manage Camera page
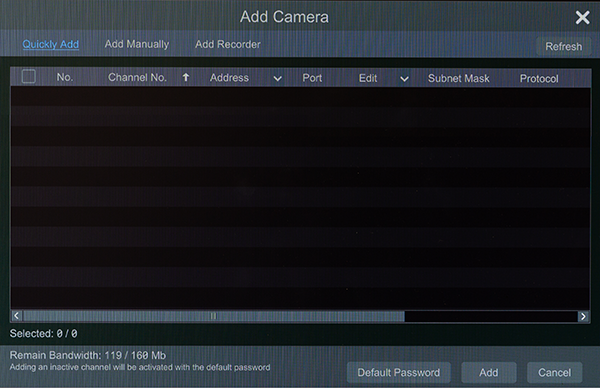
Add Camera window
When you click the Add Camera link on the left, or the Add Camera button at the top right of the Edit Camera tab, it opens a dialog in which you adds camera to your NVR.
Pro Tip: Set up your NVR's network connections before adding cameras.
Quickly Add tab
This table displays all cameras identified on the network. Select any you wish to add to the network, set their channel number, etc. Click the edit icon to edit the camera's IP address, credentials, etc. Click Default Password to set a single password for all detected cameras (this works in conjunction with OvrC).
Add Manually tab
Enter the IP address, port, and credentials of the camera, then select the protocol. Click Test to ensure everything works, then Add to add it to the NVR. Click the trashcan to remove the camera. Click Default Password to set a single password for all listed cameras.
Add Recorder tab
This window uses the same tools as adding a camera to add another NVR to your system.
Edit Camera tab
This table lists data for all of the cameras in your system. If you have a large system use the Search bar in the top right to find your camera.
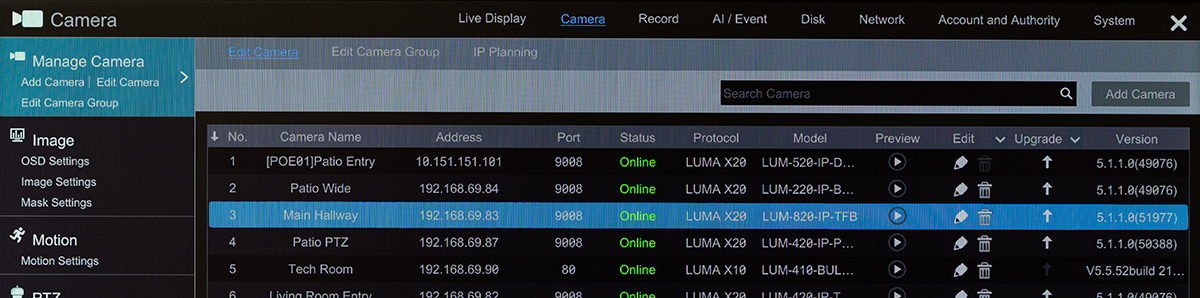
A few tips:
-
The camera's Name column also shows which NVR port it's plugged into in brackets.
-
Click the icon in the Preview column to load a pop-up with a live video stream.
-
Click Delete to unassign a network camera from the NVR (it remains available in OvrC).
Edit Camera Group tab
Here you edit camera groups, which are used by display schemes. See Output Settings tab for details on schemes.

The Add Group button at the top right creates a new group. You must name the group, set a dwell time, select a display mode, and then use the checkboxes in each image to select which camera(s) belong to that group. Click a camera's Preview image to launch a quick pop-up for that camera. Each group must have at least one camera, and a camera can belong to more than one group.
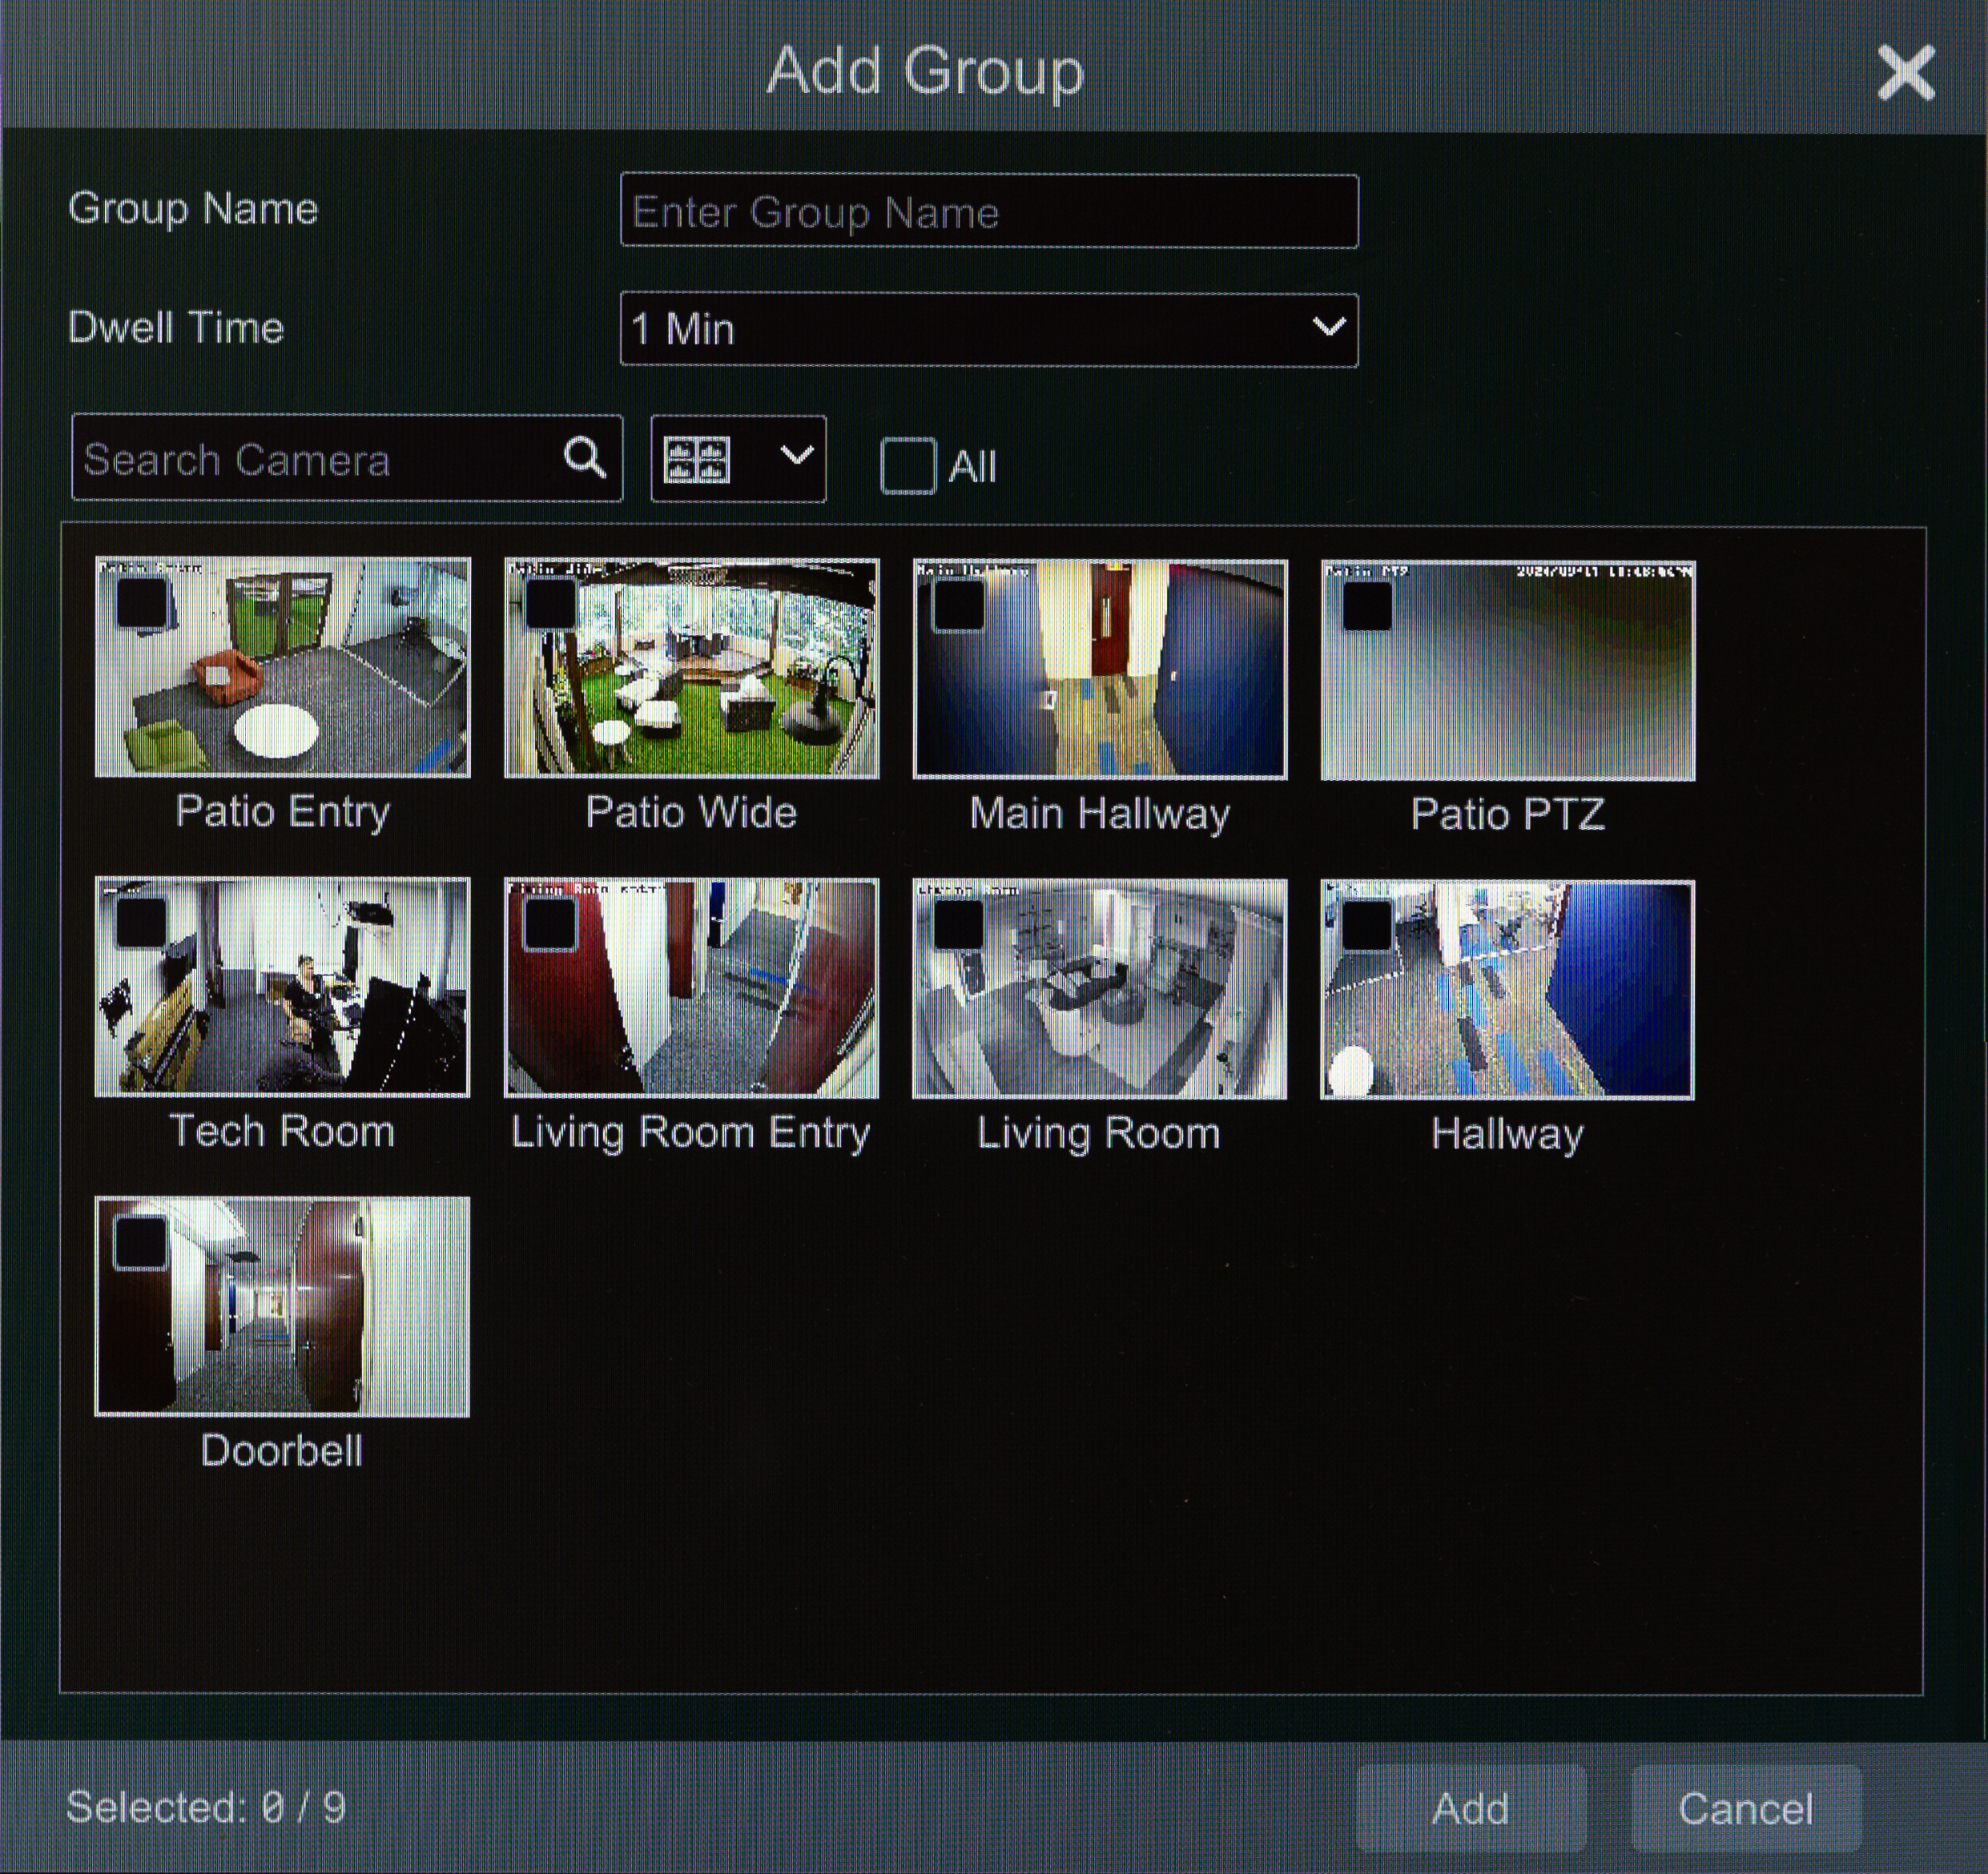
If you click on a group to select it, you can click the Edit icon to adjust the name or dwell, or the down carat to add or remove cameras from the group, or the trash icon to delete it entirely.
IP Planning tab
This function searches other recorders on the local network so you can add their IPCs to the unused channels of this NVR.
In table at lower left, click Edit icon to adjust the IP address, credentials, or other information of the target recorder.
Click the carat next to Edit.
Click the carat next to Add to add the selected IP camera. and the user may edit the IP address, user name or password by clicking behind the Edit button.
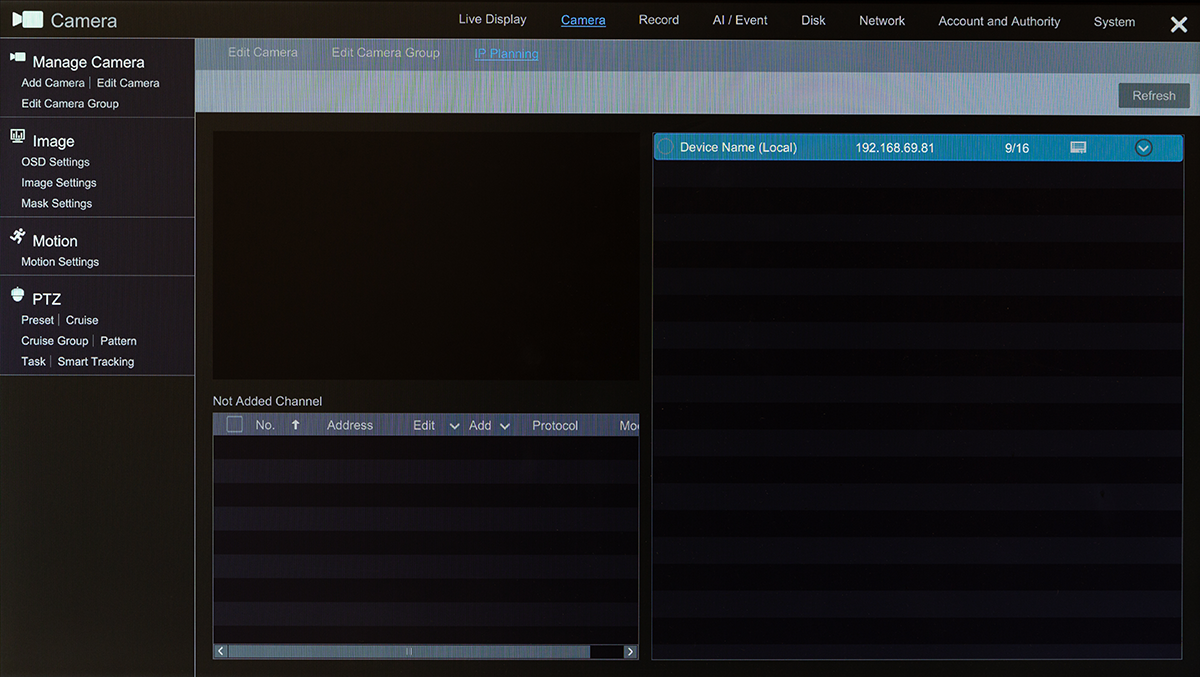
Image page
OSD Settings tab
The right side of the page shows a list of all cameras on the NVR. The table includes data on the OSD settings for each camera. At the bottom, you can navigate multiple pages of the table if needed.
The top left shows the video feed of the camera that is selected in the dropdown list below. Immediately above this dropdown, you can activate or deactivate the OSD for name and time.
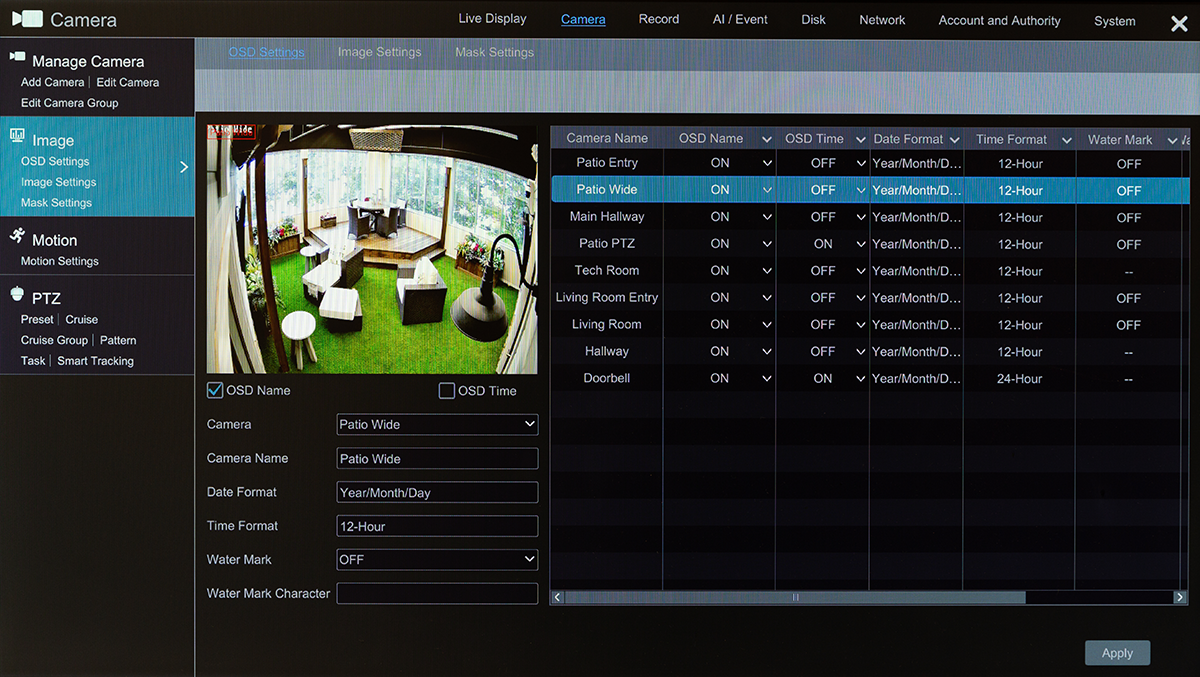
You can change the name of the selected camera. This change propagates across the NVR.
You can change the date and time format in the Basic Settings tile.
The watermark text appears when using video playback.
Image Settings tab
The right side of the page shows a list of all cameras on the NVR. The table includes data on the image settings for each camera. At the bottom, you can navigate multiple pages of the table if needed.
The top left shows the video feed of the camera that is selected in the dropdown list below.
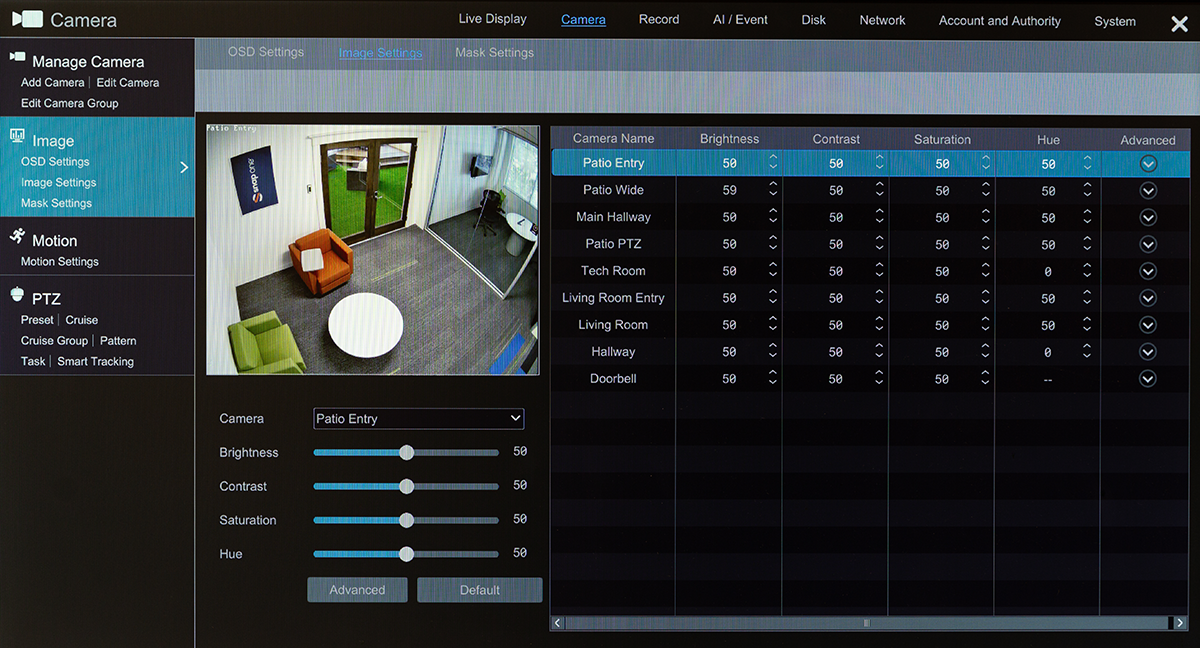
Below the image, edit the settings for that camera. You can click on the bars, or click and drag the circles. You cannot edit the values that display to the right of the bars.
-
Brightness: Set the brightness level of the camera’s image.
-
Contrast: Set the color difference between the brightest and darkest parts.
-
Saturation: Set the degree of color purity. High saturation makes for vivid color; low makes the image more grayscale.
-
Hue: Adjust the total color of the image.
Click Default to restore the image settings to factory default.
Click Advanced (either at the bottom or in the camera list at right) to open additional options. There are two or three tabs at the bottom of the Advanced panel: Image Adjustment, Schedule, and (for motorized cameras only) Lens Control.
Advanced: Image Adjustment tab
The settings with sliders also have an activation checkbox at the left; you must check the box and apply the slider setting to use these features. All adjustments save automatically.
-
Sharpness: Set the resolution level of the image plane and the sharpness level of the image edge.
-
Wide Dynamic: All x20 device have WDR active, so this has been disabled.
-
Noise Reduction: Decrease the visual noise (snow, random pixel errors, etc.). Increasing the value improves the noise reduction effect but reduces image resolution.
-
Fog Reduction: Enable this and test the settings to improve visibility in foggy, dusty, smoggy, or rainy environments.
-
Image Shift: This setting is used on the DVR only. It is disabled on the NVR.
-
Backlight: Enabling backlight compensation makes dark areas (especially backlit areas) clearly visible.
-
Off: Disables the backlight compensation function. It is the default mode.
-
HWDR: Hardware Wide Dynamic Range adjusts the image when there are both very bright and very dark areas in the field of view. It dims the bright areas and boosts the dark areas. Recording stops for a few seconds when the camera switches into or out of WDR mode. When HWDR is selected, another menu option appears, Grade, which sets the amount of WDR to use. The higher the level, the less contrast there is between the lightest and darkest areas.
-
BLC: Select which backlight compensation option to use:
-
HLC: Highlight Compensation suppresses the brightness of the image’s bright areas and reducing the size of any halo.
-
-
White Balance: Adjust the color temperature according to the environment automatically.
-
Anti Flicker: If lights pulsate or flicker in your video feed, test the settings here to try to eliminate it.
-
Exposure Mode: If you select Manual, another dropdown appears where you select a fixed value for the digital shutter speed.
-
Gain Mode: The higher the value is, the brighter the image is. This improves nighttime visibility at the cost of adding more noise. This setting affects the label and purpose of the next slider.
-
Gain: When Gain Mode is manual, this sets how bright the image becomes.
-
Gain Limit: When Gain Mode is set to automatic, this puts a cap on how bright (and noisy) the image can become.
-
-
Corridor Pattern: Enable this for situations like long hallways. Set the video resolution to 1080P or below, and choose the rotation of the camera image (in 90° increments).
-
Image Mirror: Reverse the image horizontally.
-
Image Flip: Reverse the image vertically.
-
Smart IR: This function avoids overexposure and underexposure by controlling the brightness of the IR lights according to the ambient light. When this is enabled, another menu option appears, Grade, which sets the amount of IR to use.
-
Day/Night Mode: This tells the camera when to switch to night mode. Auto lets the camera decide, Day and Night leaves the camera in that mode constantly, and Timing switches according to a set schedule.
-
Sensitivity (Auto mode selected): This sets how readily the camera switches. Higher sensitivity requires less change to make the switch.
-
Delay Time (Seconds) Auto mode selected): How long a change in light must remain at that light level before the camera switches modes.
-
Day-Time / Night-time (Timing mode selected):
-
-
Shutter Mode: If you are using manual controls, you can adjust the shutter speed to avoid flicker.
-
Infrared Mode: Choose how the camera chooses to engage its infrared emitter.
Advanced: Schedule Control
The schedule dropdown lets you choose whether to use one configuration around the clock (Full Time, then select Common or Auto, which leaves it to the camera to switch between day and night), or to switch between the Day and Night configurations on a schedule (select Timing). To set the times that the camera switches, use the text boxes to define which time span uses the Day config. All other times are considered night. You cannot edit the schedule by clicking and dragging.
When you click Save, all settings are saved for the selected camera only.
Advanced: Lens Control
If the selected camera has a motorized lens, you can adjust the zoom and focus here.
Enable the Day/night mode switch autofocus to have the camera refocus itself when switching modes.
Mask Settings tab
Your Luma NVR supports up to four video masks per camera to preserve privacy, whether it’s a secure item of yours, or a window into a neighbor’s house. Areas covered by a mask are excluded from all recordings.
The right side of the page shows a list of all cameras on the NVR. The table includes whether the mask is active, and the mask color (which cannot be edited). At the bottom, you can navigate multiple pages of the table if needed.
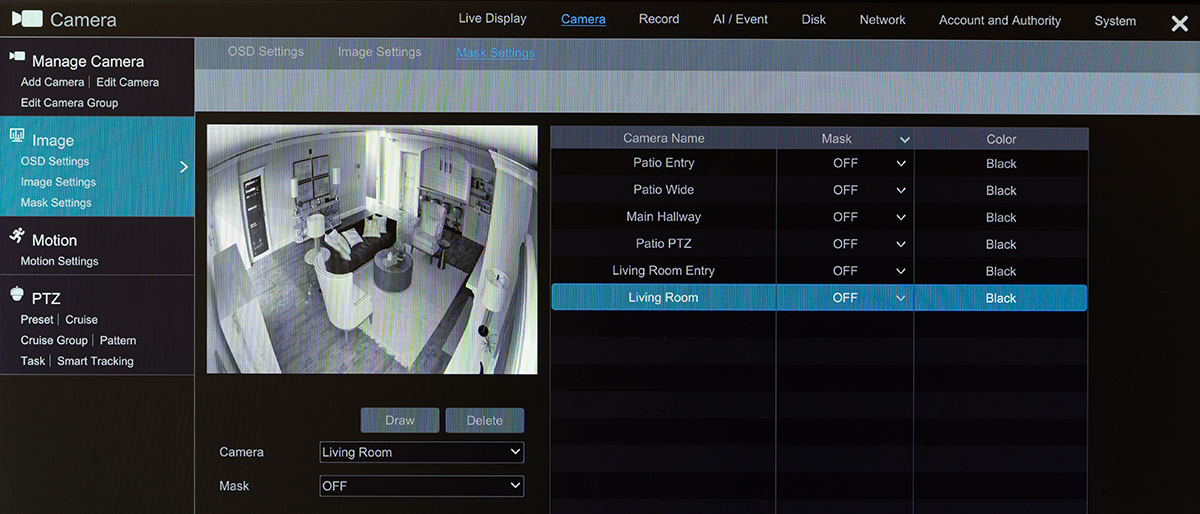
The top left shows the video feed of the camera that is selected in the dropdown list below.
Click Draw to begin drawing your mask(s). Click and drag across the screen to set the areas to block, then click Stop Draw. Delete erases all masks.
Use the dropdown to turn that camera’s mask on or off.
Click Apply to save your changes.
Motion page
Motion Settings tab
The right side of the page shows a list of all cameras on the NVR. The table includes whether motion detection is active, the camera’s sensitivity, and the duration. At the bottom, you can navigate multiple pages of the table if needed.
The top left shows the video feed of the camera that is selected in the dropdown list below.
Click and drag in the video image to add areas to the camera’s motion detection analysis. The All button fills the screen, Clear empties the screen, and Reverse inverts the selection.
Enable or disable motion for the selected camera below. Sensitivity determines how readily the camera decides if something is motion. Duration refers to the assumed time that a motion event lasts. For example, if the duration time is set to 10 seconds, when the system detects motion, any other motion detected by that camera within the next 10 seconds is considered a continuation of that motion event, and not a new event.
Click Processing Mode to go to the Motion.
PTZ page
Although this page is designed for PTZ cameras, the zoom and focus controls can also be used with varifocal cameras.
Preset tab
Here you set fixed scenes (a combination of aim, speed, focus, iris, and zoom) that your camera can move to with the click of a button.
Below the camera image are the PTZ controls. Control the aim using the buttons on the left. The central button on the left stops the camera's motion. To the right, the paired buttons let you control the zoom, focus, and iris of the camera. Below these, the slider controls the camera's panning speed.
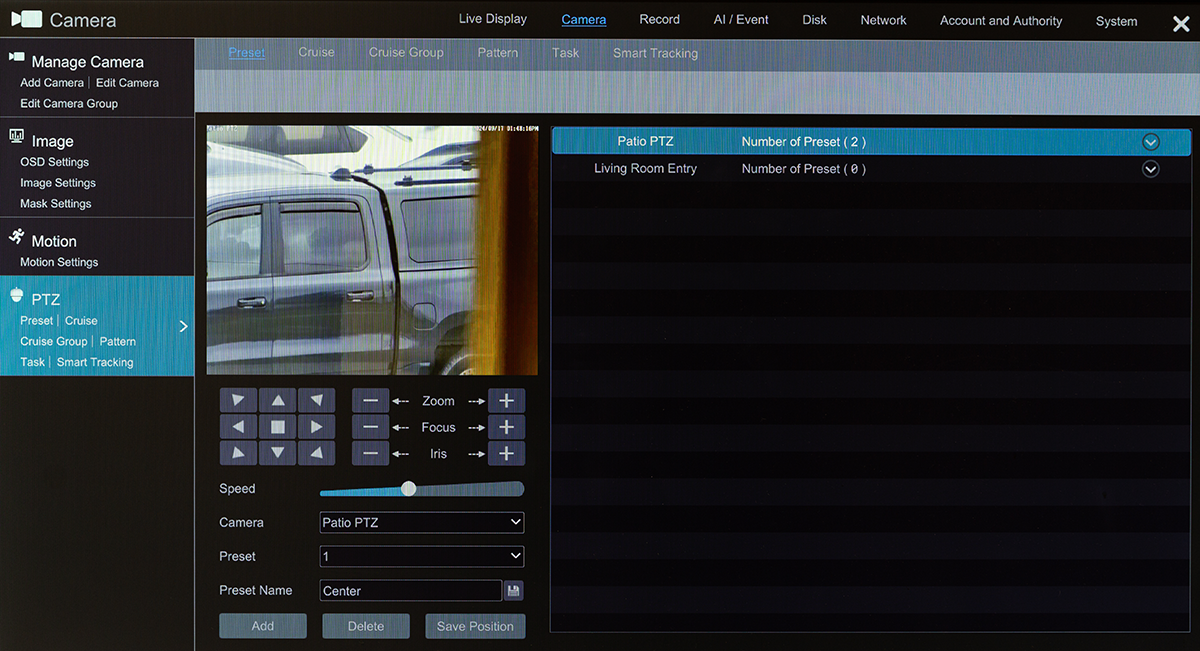
Below the controls, you select which camera you are controlling and which preset (if any) you wish to edit.
To create a preset, aim the camera as desired and click Add. A dialog pops up where you can select a number for the preset and give it a name.
After creating a preset, you can edit the name in the text box and click the disk icon to save the change. To adjust a preset's aim, select that preset, adjust the settings, and click Save Position. Note that the NVR and camera have separate presets.
To delete a preset, select it from the dropdown menu and click Delete.
To the right, a table shows the cameras you have and the various presets created for each. Click the arrow icon to go to that preset, or the × icon to delete it.
Cruise tab
A cruise cycles the camera through a designated series of presets. It is only enabled for PTZ cameras.
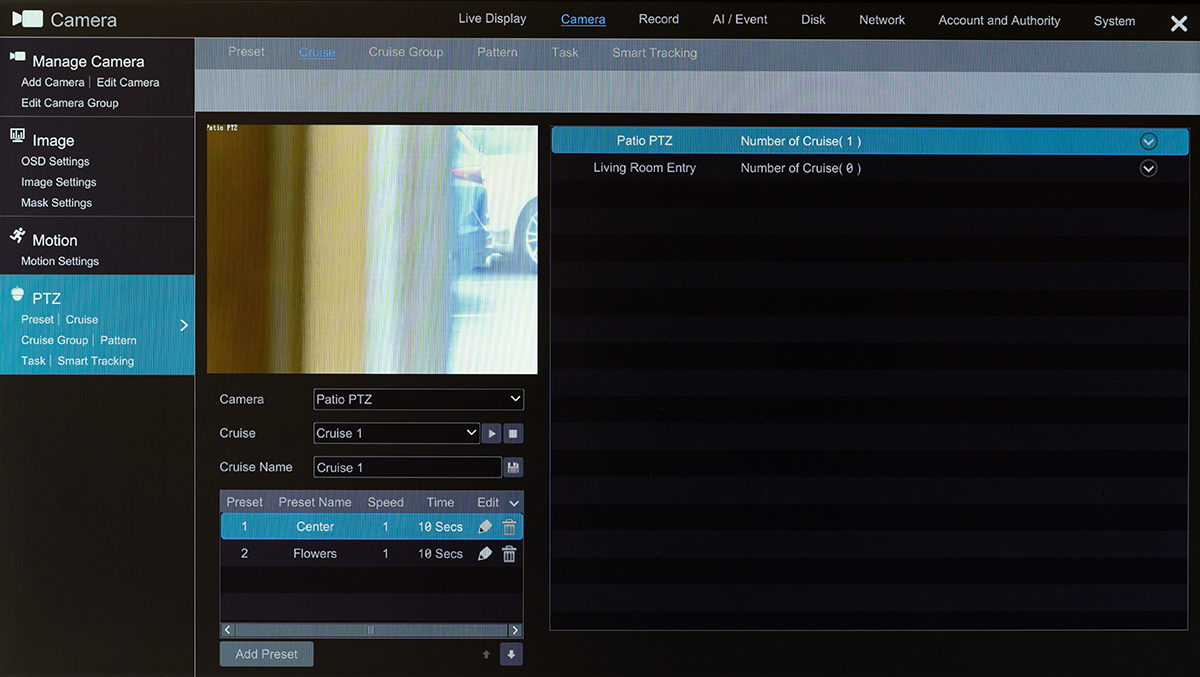
To add a new cruise, click the down carat at the right side of the camera's entry, then click the + button. Name the cruise, then click Add Preset for each preset you want the camera to visit. The Time column shows how long the camera stays at that preset, and speed is how quickly the camera moves to that preset. This overrides the preset's inherent speed setting.
When you have several presets added, click on a preset and use the up and down arrow buttons to change the order that the cruise uses. Click the Add button when finished editing to add the cruise to the camera.
Once you have one or more cruises, you can select a cruise to play it (or stop playing), edit its name, and add or remove presets, change their order, etc.
To delete a cruise, click the down carat on the camera's entry, then click the X next to the cruise name.
Cruise Group tab
A cruise group cycles the camera through a designated series of cruises. Each camera has one cruise group.
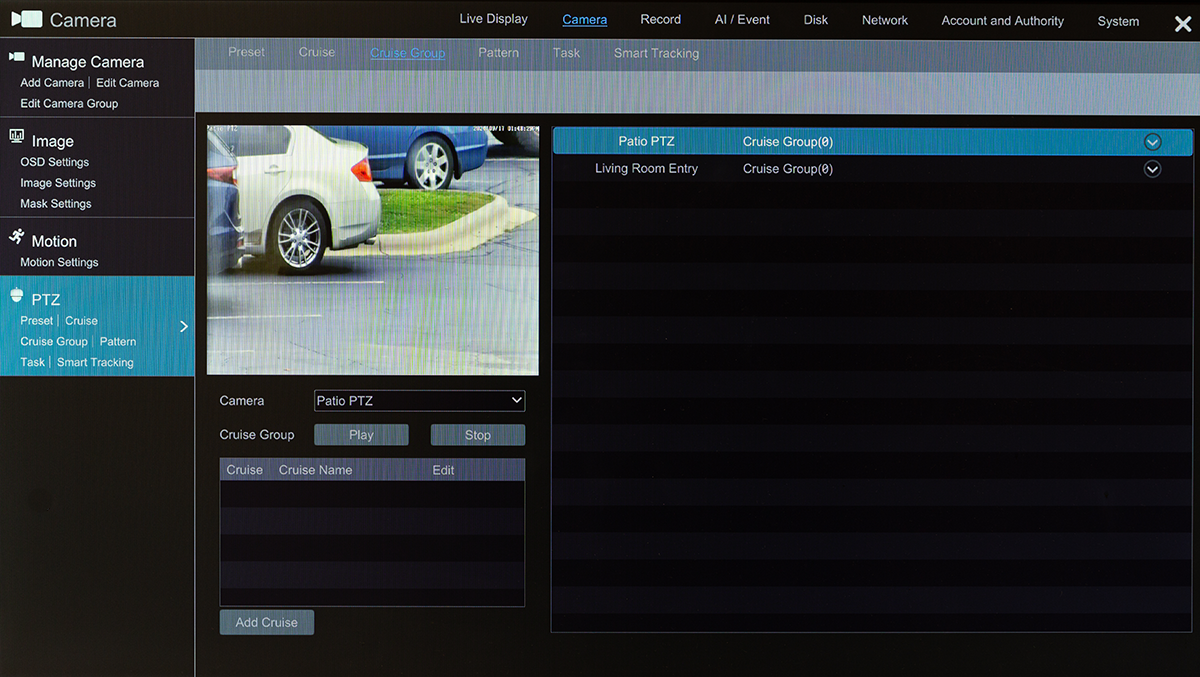
To add a cruise to a group, click the down carat to the right of the camera's entry, and click the + button. Select the cruise to add from the dropdown. You can also click the Add Cruise button at the bottom of the table.
Click Play and Stop to view the cruise group shown in the table below.
In the table, click the trashcan to remove that cruise from the group.
Pattern tab
Here you set fixed scenes (a scene is a combination of direction and zoom) that your camera can move to with the click of a button. This option is only available for PTZ cameras.
Choose the camera to edit. from the list at right.
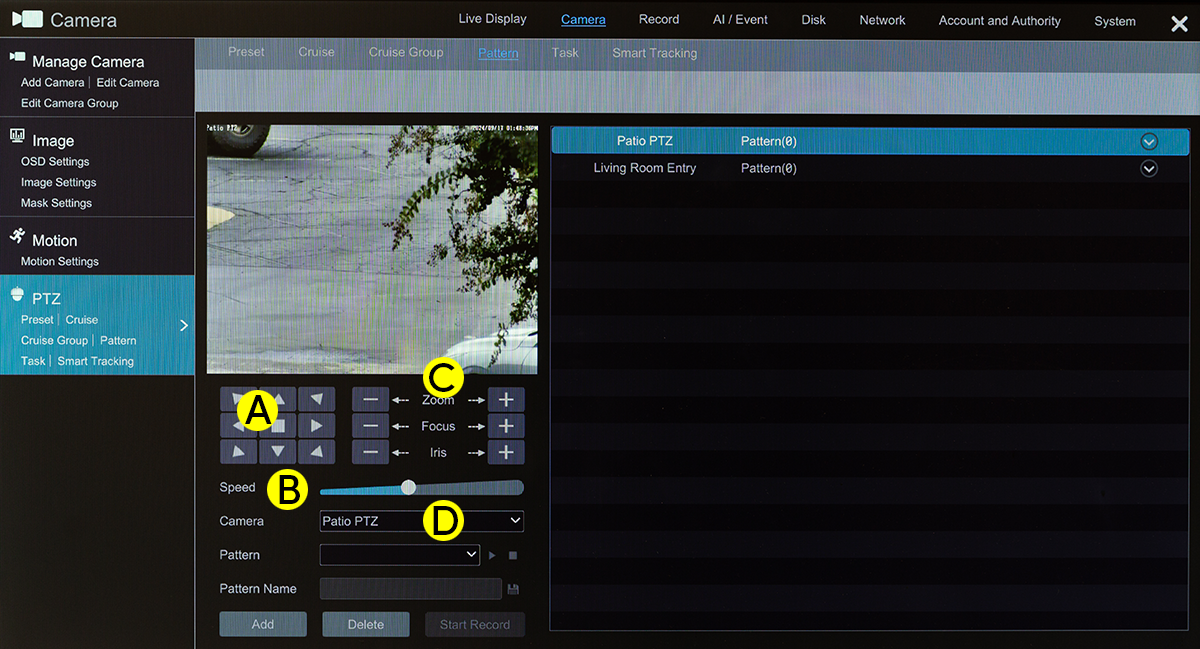
Below the camera image are the PTZ controls.
-
Control the aim using these buttons. The central button on the left stops the camera's motion.
-
This slider controls the camera's panning speed.
-
The paired buttons let you control the zoom, focus, and iris of the camera.
-
Below the controls, select a camera to adjust.
Below the controls, you select which camera you are controlling and which pattern (if any) you wish to edit.
To create a pattern, aim the camera as desired and click Add. Alternatively, click the down carat next to a PTZ camera's entry, and click the + icon. A dialog pops up where you give the pattern a name.
Once you save the pattern's name, the system immediately begins recording your actions. .
After creating a preset, you can edit the name in the text box and click the disk icon to change it.
To delete a preset, select it from the dropdown menu and click Delete.
Task tab
Here you schedule your PTZ camera to undertake certain activities at certain times of day.
Select the camera, then select which function it should use. If there are several options within that function (for example, several presets), select the specific one under the Name dropdown. Then set the start and end time, and click Add.
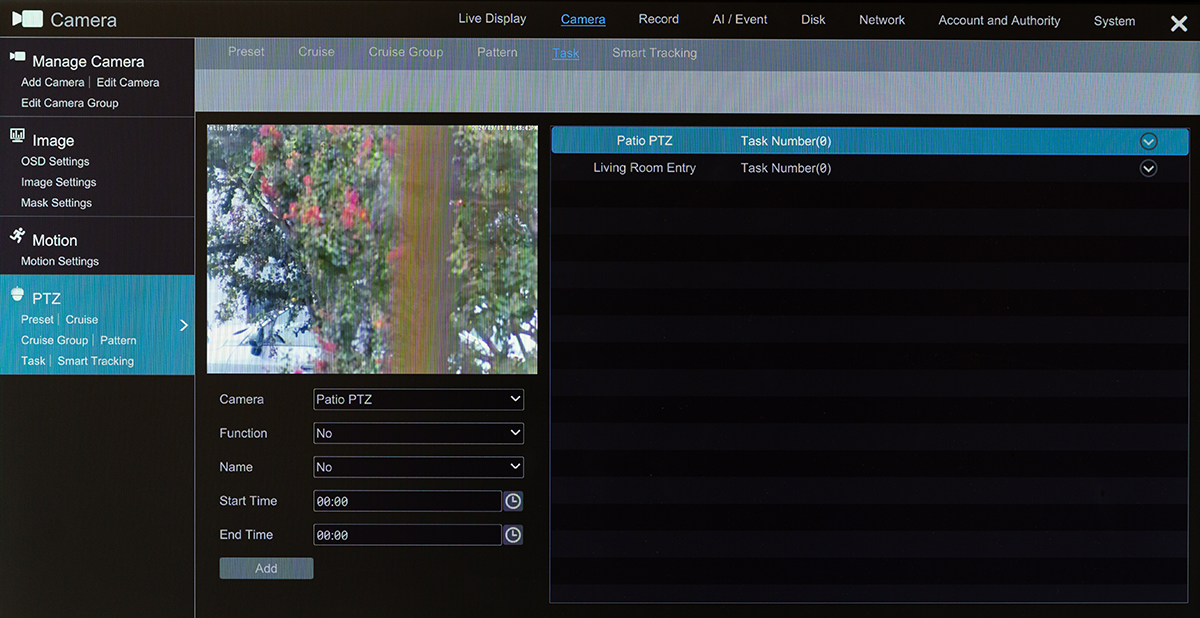
The table at right shows all the cameras. To see which Tasks are assigned to each camera, click the down carat at the right of the camera's entry. You can enable or disable all tasks on a per-camera basis, and edit individual tasks by clicking the edit icon under the Operation column.
Smart Tracking tab
Your PTZ can track objects that it detects moving.
![]()
-
Camera: Select the camera to edit.
-
Tracking Mode, select either:
-
PTZ Auto Tracking Priority: If selected, when an event triggers tracking, you cannot control the PTZ through the PTZ control panel in the live view interface.
-
Manual PTZ Control Priority: If selected, when an event triggers tracking, you can control PTZ by clicking the buttons on the PTZ control panel in the live view interface while it is engaged in smart tracking. After you cease control for 5 seconds, the PTZ camera returns to its pre-defined detection area to await a new target.
-
-
Still time: While enabled, when the tracking target stops or hides behind an obstacle for the length of the indicated time, or the target tracking is complete and no target appears in the detection area during the indicated time, the PTZ returns to its home position. If it is not enabled, the PTZ returns to its home position after 5 seconds.